Showing posts with label art room. Show all posts

Tuesday, August 7, 2012

DIY Faux 'Air Plant' (Sculpey Moss Pouch)

These little pouches started out as a combination of some handmade clay necklaces I saw at a flea market and the idea of a terrarium+air plaint. Initially, these were to be necklaces....but the more that I worked with the sculpey-oven-bake-clay, and the moss, I decided they would make great little wall hangings.

Do you remember the picture frame around the peep-hole on the show Friends? These colorful plastic frames have sat empty in my art room as a tribute to that much loved little piece of decor from my favorite show. An now I finally have something cool enough to hang inside.

You can buy sculpey for about $1 at hobby lobby or michaels...its often on sale...The dried moss can also be purchased at a craft store. This is a very easy+cheap little craft!


These are a non-traditional classroom decor item.  But since my room has no windows, I think they are a fabulous addition. A little bit of natural green that needs no sunlight and no watering.


They are tucked in a little corner behind my desk, just above my aprons.

And just for fun, here is my teacher-chair. I recovered it with this vintage fabric using a staple gun. Pretty easy makeover!


Wednesday, July 18, 2012

Teacher Desk Makeover

The only thing I remember about Clarissa Explains it All (you know, that Nickelodeon show from the 90s) was how cool her bedroom was. She had the most amazing furniture and decor. Realistically, it wouldn't be very cool to decorate my entire home like a teenager's bedroom (even though my clothing is usually piled up in every room)but I have always wanted to paint a dresser or something to look like her room.

 This is a project that I have wanted to do for several years, I just haven't ever made the time for it. The design for my classroom desk was based on this basic mural painting.TIP: If you ever decide to paint wood, always use primer first. I was so anxious to get started, that I didn't want to make a special trip to buy anything, I just wanted to start. I did finish it off with a double coat of polyurethane so hopefully that will be good enough. I painted this desk with regular 'ole acrylic paint. I even painted my trashcan to match!


Here is all the owl stuff on my desk!

Favorite detail!


The work crew installed new cabinets in one corner...You can kind of see them in the 1st picture. While painting my desk, I started organizing. Then I decided to move my desk to a new spot...and move some shelves....and reorganizing. I've been to school several times this summer to finish up this project....and get things ready for next year. I will post a few more photos of my classroom once I have finished hanging up my new visuals for the year. To see shots inside my room from 2010 click here and here. Also, more photos are here and here.

Saturday, February 18, 2012

Teach Like a Champion

This week, I found a quote from a book I am reading for my professional development plan at school.

Why is it that the best coaches often rise from the ranks of the almost- or not-so-great athletes, while the most gifted athletes rarely make the best coaches? Why is it that brilliant and sophisticated actors can't help others do something similar and are so often at a loss to describe how they do what they do? Meanwhile, unheralded thespians manage to unlock wold-class talent in others?


One cause may be this: superstars often don't have to pay meticulous attention to the what's-next and how-to of each step. The very thing that makes them brilliant, an intuitive and lightning-quick understanding of how to handle a given problem on the stage or the court or the field, keeps the most talented from recognizing how the rest of us, for whom the intuition does not come quick as silver, learn. The rest of us, who cannot see it once and then do it ourselves beginning to end, are more likely to take complex tasks and break them down into manageable steps. We move piecemeal toward mastery and need to remind ourselves over and over what step comes next. (Lemov p. 77)

The book is "Teach Like a Champion" by Doug Lemov the managing director of Uncommon Schools.

Whenever I am carrying the book around school, in an attempt to get some reading done (yeah, right), I'm always a little embarrassed of the book because the fact that I am reading it makes me feel pretentious....but so far the book has been a handy tool....with its '49 techniques to help put students on a path to college', it has given a name to many of the strategies that I already use and given some serious food for thought on ones that I should implement and don't.

For instance, I rarely use any questioning techniques in my classroom. The majority of what I do is performance based. I preform, the students observe and follow suit. When I say that I perform, I mean that I put on a real tap dance, a horse and pony show, complete with special voices, and jokes. I jump through hoops and I overly exaggerate the stories to emphasize my main points.

I model, illustrate and demonstrate and the students follow my lead, step-by-step.....adding in a bit of 'kid-flair' here-and-there making each artwork their own. Many of the materials we use in art require this sort of set-up...especially with 11 classes of kindergarten, I get into the same routine day-after-day.

Often, questioning opens the kindergarten classroom into a free-for-all of 'One time my kitten.....' or 'I'm a parent pick-up' or......leaving my questions floating in the breeze, while the classroom spins into a dead zone where neither learning nor anything productive is happening as I wait patiently for the student who raised their hand is stumbling through some mundane, off-subject tale with no ending.

Clearly many of the techniques in the book are intended for students aged 10 and up....most likely middle school.

But this book gives suggestions for using questioning in a very important way. It explains how to 'hold out for all the way' and require 'right is right'....making sure students answer correctly, instead of me settling for a half-truth in order to move on to the next step or the next question. I have already implemented this. Whenever a student gets an answer wrong, or they say 'I don't know,' I call on on another student, and then return to the one who was initially wrong and have them repeat the right answer. I've started implementing a rapid-fire questioning game at the end of art, cold calling some students, something I rarely did before this year.

Two other techniques including 'stretch-it' (which tests whether or not students know why the answer is what it is) and 'cold call' (you want everyone to pay attention so you call on anyone, even those who do not have their hand in the air.....not just as a classroom management technique, but because you genuinely want everyone to get it right, and know why they answered the way they did).

One day, while looking at a very famous woodblock The Great Wave by the Japanese artist Hokusai, I asked a girl (who wasn't paying attention), "Jane, what do you see?" ......Silence. I waited. 'Jane, what do you see in this painting, what do you think it is about?".....Silence......"I don't know."......"You don't know? Well, look at it? I've already said what the title is....and other students have suggested what they see....just tell me something that you see?" (I pushed her, and she closed up. I was getting frustrated)

UGH!! Fatal flaw. I should've had someone else answer and then gone back and had her repeat what they said. I was frustrated with a little 1st grader giving up...so I was grasping for something....and coming up short.

As the day went on, I made a really amazing discovery. After looking at about 4 or 5 of Hokusai's 36-Views of Mt. Fuji, I asked students about the Great Wave. Standard questions, what do you see? but when I asked the first few classes "What do you think the artist wanted you to feel when you look at this painting?" Many kids blurted out Happy! When I pushed for "Happy, why?" They couldn't answer so they quickly changed their answer to Sad!

Finally, after a few minutes of this...them struggling to find the right words....I would bring a student up to the smartboard screen. "Now, put yourself in the image....if you were part of the scene, if you were in the painting, where would you be?"

"On a boat...in the water..."

"Okay....if you were on a boat.....and you saw that big wave....how would you feel?"


"Terrified. Afraid. Scared."


Okay!! Now we are getting somewhere. An aha! moment!!


I would bring up a couple more student to experience the great wave hovering over them. And I would ask additional questions like "Why would you be afraid?" "Would you even be thinking about the mountain if you saw such a big wave?"


When looking at and evaluating artwork, I know that I need to implement better questioning skills. That is my goal this year in the classroom. I really want to improve my questioning skills so that students are really LEARNING and not just COPYING what I do.
Tuesday, August 23, 2011

Two painting ideas combined

A few weeks ago I told you about a really cool painting on Alisa Burke's blog...I fell in love with it and made two, one for my home and one for my classroom.


In the meantime, I completely fell in love with this crayon wax melting on the whatever blog. I guess these are all over pintrest?
I decided to combine the two into a totally new, fun painting for my classroom!!

I'm really happy with how it turned out!! Such a fun, easy, creative thing to accomplish for such a busy time of year!!

Monday, August 1, 2011

Large Painting with words {Addict}

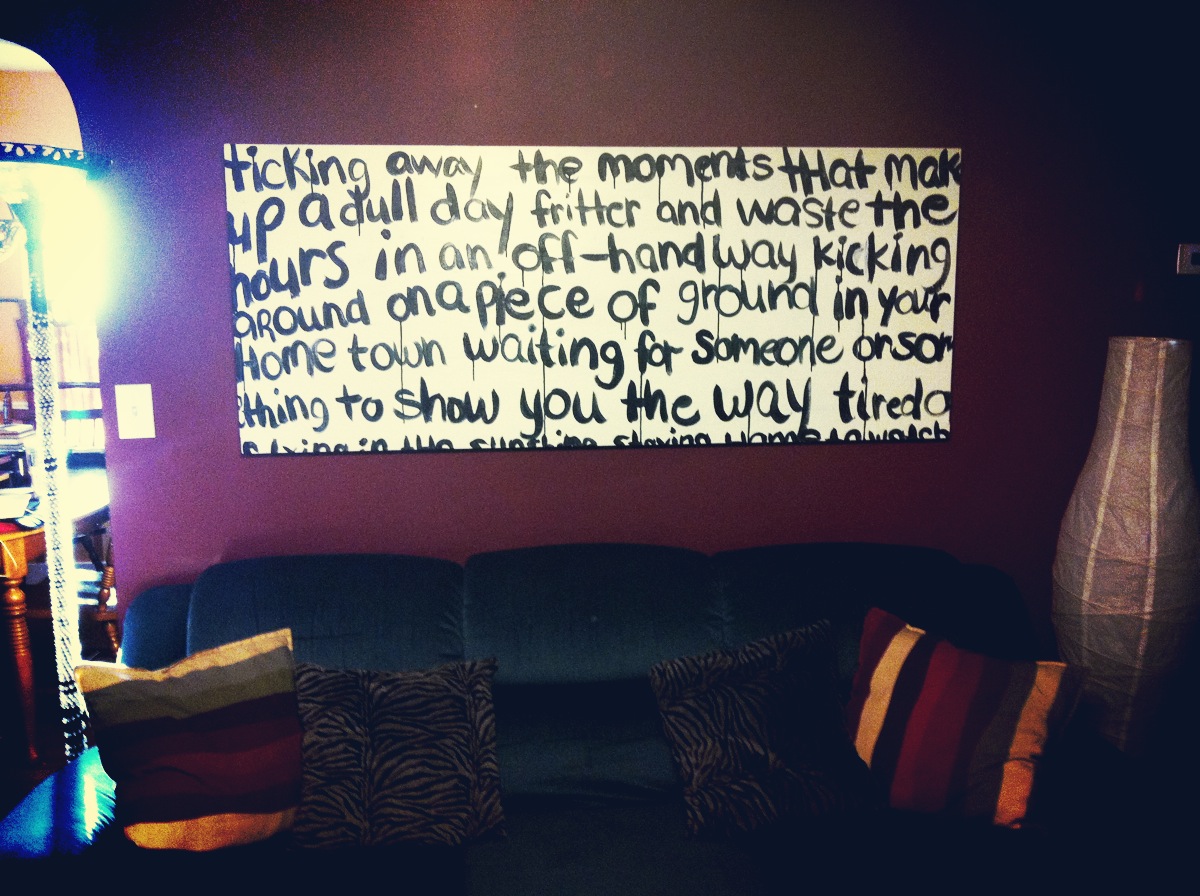
Recently, I've realized that the dark wall color in my living room and lack of light bearing windows makes my front room a dim cave most of the time. In search of ways to brighten it up, without repainting, I came across an idea that I immediately fell in love with.

On Lisa Burke's blog, she posted about how to create a large painting full of text and I knew immediately that it was the perfect thing for my home (and I already had the perfect canvas ready to go!)

I went down the the basement, found some old white house paint, primed the surface and searched through songs to find something that reflects what I am feeling at the moment. I chose two verses from 'home' by Pink Floyd.
As you can see, even with the morning sun streaming through the dining room, my couch is in the dark. The painting has added a large, white reflective surface to the room, especially when the t.v. is on. Maybe not so much in the morning, but it is much brighter than the mirror and photo frames I had on the wall before.

Now I just need to make some new colorful pillows so that my living room will look half as trendy as Lisa's! (I really should go back and take a photo during another time of day with a camera other than my iPhone...but whatevs)


I was so in love with Lisa's painting that I also really wanted to create one with the ee cummings poem, 'I carry your heart.'  I had another large canvas so I decided to paint it and take it to school to spruce up my room for the year.


Anyway, I decided that the worthless back corner behind my desk needed a makeover so I have been busy this summer clearing away the clutter. You can kind of see the 'before' picture of this corner and the old  poster collage on the wall behind my desk in this photo.

 I am going to leave the lomography rainbow up for the year....hoping to inspire students with my artwork. I am also thinking about doing a lesson with this poem to start out the year, because I know it will be a conversation starter for the students.

Have you done anything new in your classroom? What song or poem would you paint on a large canvas?

If you are interested in stretching your own large canvases, check out my DIY on the Birds of a Feather blog from last summer.

Thanks for reading!!

Friday, April 29, 2011

Photo Collage Friday. {Number Two}

This week....we haven't been allowed to use the internet in the mornings....and I am busy getting my computer cleaned off in preparation for a new one in the next few weeks. So much to do! Well things are getting rather wild and crazy at school, as they always do this time of the year. I try to stop and photograph beautiful things when I spot them....here are a few of my favorite 'art room photos. Enjoy this collage!!

p.s. I am thinking about having some of these photos blown up into 20X30 posters for my art room...wouldn't that be awesome!

Wednesday, December 8, 2010

Hello, its cold!

Greetings from the art room.

I try to keep my Amazon listmania list up-to-date with my favorite art books. There are just some books that are so fun to read out loud to kids, I end up reading them every year.

I thought it would be fun to share some of my list with you.

Click here to go straight to my annotated list of favorite books on Amazon.com. 

The pictures below aren't hyperlinked...jut screenshots.

Hope you are having a great week! I would love to see your favorite childrens lit books...if you have  blog post or have listed your favorites elsewhere, please leave a link in the comments!

Thursday, November 18, 2010

I have a DATE!

With Harry Potter at midnight!

I am doing a quick photo shoot after school and then I am going home for a nap...so I can be well rested in time for the midnight showing of Harry Potter! I can't wait!


Here are the finished over-sized art supplies from a previous post. They turned out pretty good! I am working on one more, a box of crayons!


I love the lumpy-bumpyness of paper mache. These were painted with acrylic paints (the silver scissors are tempera paint) and then coated with some polyurethane.

I will photograph them sitting up on the shelf in my room later. The kids love them!

Are you going to see Potter tonight?

Thursday, November 11, 2010

Over-Sized Art Supplies via Paper Mache

Over the summer, I got some new cabinets installed in my art room and I realized that I needed something on top, for decoration. So my student teacher helped me create some fun new 3-D over-sized art supplies to go up on top.


We cut and taped cardboard boxes and scraps and then tore up newspaper strips, attaching them with a water-glue mixture to create a paper mache` covering. I added another coat of newspaper...and we started painting today...so stay tuned for the finished product!!

A huge 'paint jar' with the brush sticking out.
Giant scissors!
Made out of cardboard...the round thing holding the blades together is a cardboard tape roll.
Giant glue bottle...made out of cardboard and a box.

I can't wait for you to see the finished product!!