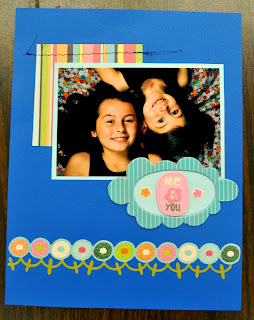
Sometimes I really HAVE to make some traditional scrapbook pages. I took a class, From Something to Nothing...and I didn't exactly do the prompts....but the class did inspire me to create this book for my cousin's 4th grade graduation. I have tons of pictures of her (way more that I just need to have printed) and I have tons of supplies that match her style...She loves owls (just like me) and she loves turquoise (just like me)....and she is my art student! You might notice that she is wearing either turquoise or black in almost every picture below!
This was such a fun album to work on. I hope I can get some more pictures developed and more pages made before the end of the school year. It was so fun using up all of my supplies and making something so lovely. I actually did all of the work at Nelliepallooza, my scrapbooking retreat--the 8 1/2 X11 format allowed me to get lots of pages done in a short amount of time and in the 3-ring notebook, it will be easy to store, add more pages and look through.
My inspiration for this page truly came from Shimelle's class....I have tons of letter stickers...and this set is super old, I decided to use ALL of the letters to create a custom background! I actually used this same picture twice....but I really love it...I may keep this layout for my personal scrapbook!
Here is another layout that uses the same picture twice....Once I get my photos developed, I may substitute one of them for a newer picture....I just had two versions of it and happened to use them both.
I haven't really added any journaling, mostly it is just stickers and papers...with some real stitching.
I know that Emma will love her book...she made ME a duct tape clutch purse for my birthday! She is super crafty and creative. I can't wait until she is older, I know we will be friends!
Thanks for reading!
Showing posts with label gift ideas. Show all posts
Showing posts with label gift ideas. Show all posts
Saturday, May 8, 2010
Saturday, December 19, 2009
An early Christmas present!

Look what my sweet mentor and friend Leslie got me for Christmas! I am in love!!!


Its the last Saturday before Christmas....doing anything special? I hope to spend the evening with my dear friends and family!! ;0)
Sunday, January 11, 2009
SWEET Workshop Valentine Stuff

Hey everyone!! I am getting ready for a workshop tonight. I have about 5 gals coming over to make Valentine-themed stuff. I am really excited about the lip balm holder that I showed awhile back.
In addition to the lip balm holder, we will be making a treat folder too. This little treat box will fit over a box of candy hearts. I bought both the sour and the regular heart candies. The girls can pick out which one they want to go inside their treat holder. This was really easy to make. I ate the candy out of one of the treat holders and tore it open so that I could figure out where to score it. I laid the empty carton on top of my cardstock, made a little tick mark at the top and bottom and then scored.

I made a whole bunch of these little guys so that I could hide a note inside for the penny game that I play at my home gatherings. Anyway, it is secured with ribbon and a simple little scallop punch design on the front. Check out the super cute little safety pin that holds the 'love' tag in place!! I love it!!
While I am at it, here is a really simple box I made using Close to My Heart patterned paper. Inside the box there are four 3 1/2 cards.

AND OOH LA LA!! This is some lotion I got for Christmas from Victoria Secret!! I love it, so sweeeet!

Monday, December 22, 2008
GREEN Christmas Creation
Last night, I had all my supplies laying around that I had used to make my canvas with images from recycled cards. I wanted to make another canvas, but I didn't have any that were blank so I decided to come up with something. I have been really thinking about ways I can reuse packages and products. This blog gave me a really good idea. I looked around my craft room and spotted a box flat. I use these constantly to store scraps and art supplies at school. They are free and reusable over and over again. I remember one time in college I had to set up an Art Interest Center as a place to hold art supplies that could be changed throughout the year. I used a cardboard box and my teacher actually told me that I should invest in a tote. I remember thinking....a cardboard box is free...and recycled....now they are my most basic staple as a teacher. I use them to cart materials from school to school and as glitter trays. They are free!! Anyway, sorry to rant. Here is the box I had at home.

I decided to cover it with some Martha Stewart paper. I have several rolls that I got on clearance last year. I used those sheets of sticky dots on the large flat side of the box and then folded it over and taped it inside the box. I learned how to fold the paper like this in college when making canvases. Nothing too fancy, but it is just tucking the corners in without cutting them.

I had a bunch of shapes left over from the canvas. I used my Martha Stewart craft punch to cut them out. It was the exact perfect shape to fit inside the bottle cap. When I was thinking of how to arrange them on the canvas, I remembered a really cool technique I had seen on Alli Edwards site from 2007 using bottle caps. I ran to the kitchen.....and scattered all over the counter tops (did I mention that I had a Christmas Party Saturday night and I spent Sunday working in my craft room rather than cleaning.)

Anyway, nearly 2 dozen bottle caps littered the counter tops so I grabbed them up and started arranging them. I put the little punched shapes from Christmas cards inside each one. I could've added beads, glitter and gloss...but I liked how simple they were with the tiny image, and lots already had glitter. I arranged them in the shape of a Christmas tree, added glue dots and VIOLA!! A little Christmas masterpiece.


One other thing to help me hang it up. I used a glue dot on each end of this ribbon. The ribbon is from the a Christmas ornament package.

Anyway, file this in your idea box...It was so easy and almost made completely from re-useable products that you might have laying around.

I decided to cover it with some Martha Stewart paper. I have several rolls that I got on clearance last year. I used those sheets of sticky dots on the large flat side of the box and then folded it over and taped it inside the box. I learned how to fold the paper like this in college when making canvases. Nothing too fancy, but it is just tucking the corners in without cutting them.

I had a bunch of shapes left over from the canvas. I used my Martha Stewart craft punch to cut them out. It was the exact perfect shape to fit inside the bottle cap. When I was thinking of how to arrange them on the canvas, I remembered a really cool technique I had seen on Alli Edwards site from 2007 using bottle caps. I ran to the kitchen.....and scattered all over the counter tops (did I mention that I had a Christmas Party Saturday night and I spent Sunday working in my craft room rather than cleaning.)

Anyway, nearly 2 dozen bottle caps littered the counter tops so I grabbed them up and started arranging them. I put the little punched shapes from Christmas cards inside each one. I could've added beads, glitter and gloss...but I liked how simple they were with the tiny image, and lots already had glitter. I arranged them in the shape of a Christmas tree, added glue dots and VIOLA!! A little Christmas masterpiece.


One other thing to help me hang it up. I used a glue dot on each end of this ribbon. The ribbon is from the a Christmas ornament package.

Anyway, file this in your idea box...It was so easy and almost made completely from re-useable products that you might have laying around.
Wednesday, December 17, 2008
Memory Keeper Box
The same day I got this box in the mail, I covered it with paper and had it ready to give to a friend. My best friend's mother recently lost her husband. David had been in the hospital for over a month and Kathy had kept a journal every day. The journal was a steno pad, completely filled, some pages front and back. When the steno pad was full, she wrote on lose paper and stuck in in the back. The tattered book was in her purse for weeks after his death. As soon as I saw it, I knew she needed a safe place to store this treasure. I made this box with silhouette paper and some papers from the travel paper pack. The strip of aluminum, the decorative corner, and one chipboard shape are from my stash. Oh, and the keys are actually vintage keys that I got in Sweden when I was in college. I have been saving them for a special project like this. I inked the edges and used a sponge to make it look a bit more distressed, but I left the chipboard letters stark white to match box. I really love this memory keeper box. I took it to my workshop that night and the ladies were astonished that I had finished it so quickly (I used a card with an old piece of sheet music, it was already assembled and I glued it to the top). They asked if we could do these in a workshop. I love it that the boxes are less than $7, this makes them a perfect workshop item! Enjoy!! If you have any questions, please ask!
(I haven't given it to Kathy yet, the roads have been to icy to take it to her.)


(I haven't given it to Kathy yet, the roads have been to icy to take it to her.)


Wednesday, December 3, 2008
Stamping on Ceramic Tiles


Also on Monday I got in an order of ceramic tiles from Oriental Trading Co. I used black StazOn Ink, Close to My Heart Stamps and I stamped these great coasters for a gift exchange later this month. I intend to put cork on the bottom. I put them in the oven for 15-20 min. at 350 degrees to heat set them. If you want to know the stamp sets I used, just ask. I have a lot of stamp sets and tons of permanent markers I could've used to color on these tiles, but I love the black and white...it is so modern and I think these could potentially match anyone's decor.
Subscribe to:
Posts (Atom)


