Showing posts with label spiva. Show all posts

Saturday, January 7, 2012

Pinteresters Anonymous

******Advertisement Alert********* 

TOOT TOOT TOOOT TOOT!! 

I'm totally tooting my own horn in support of the upcoming class I am teaching at Spiva Center for the Arts in Joplin.

Ages 21+
Cost $20 includes up to 4 projects and snacks.
Saturday January 14th 7-9pm

Do you need a "Pintervention?"

Do you spend hours on your computer 'pinning' projects you would like to do?

Well this your chance!

Bring your friends and enjoy an evening of creativity.

If you are a DIY diva or want to be, this ongoing class offers the best of the projects as seen on Pinterest.com.

Mark your calendar now for Second Saturday.

It's sure to be loads of fun so sign up early to save your spot. Groups are welcome!!

These projects are tentative and subject to change: Doily Votives Tissue paper pompoms (easy and cheap and everyone should know how to do this) Glass Etching (so you can go home and etch your Pyrex!)

Instructor: ME!!
*To see what I've been pinning, check out my Pinterest page here!

Please contact Spiva at 417-623-0183 to sign up!!

I'm super excited!!

Monday, October 31, 2011

Halloween Post!

Whew!! What a month October has been!

Busy.Sad.Busy.

I am so ready for Christmas.
I've already started making plans for the annual Christmas party.
SO. MANY. AWESOME. SURPRISES!!
I can't wait!! I'm ready to put the tree up right now.

I didn't get super into Halloween this year. Not much can top last year's concert+Power&Light in KC for Halloween.

Friday night, I worked my school carnival in my Eric Carle, Very Hungry Caterpillar costume. 

Saturday night, we did a haunted walking tour of Joplin's downtown. It was cool, a few 'spooky' reenactments and a lot of history (Highlights: hobo camps, the KKK and prostitution on Maiden's Lane).

Sunday, went to see Paranormal Activity 3, it was pretty good...not as scary as the first two, but it was set in the 80s and that was pretty cool.

Today, I had a dentist appointment so I took the day off. I think I needed some time to get things caught up around the house and relax. Rather than cater to trick-or-treaters, I worked at Spiva with my Art Lounge class this evening. They finished up their giant paper mache head sculptures and we took some pictures, ate waffles and had a life drawing session with the giant heads on. It was super fun. 


Hmmm....I planning some blog posts for the next few weeks. My blog has been way too sad lately! Watch for some fun stuff soon.

Thanks for reading. HAPPY HALLOWEEN!!

Wednesday, July 27, 2011

Faux Aluminum Sculptures DIY +{the inspiration}

 I don't normally share art lesson plans on this site, but I am pretty proud of this one. While brainstorming about my Art Lounge class for high schoolers at a local art center, I put several things together to come up with this highly successful project.

First, my mom had just given me a huge bag of hotel soap that had been donated to her during the tornado relief. I knew I would think of something to do with it.

Second, I had intended to do a carving project with the Art Lounge students either incorporating potato carving or soap as a stamp for a 2-D project. I was getting a little sick of 2-D and so were the kids.

Third, my friend, Brandon Nepote was at my house a couple of weeks ago working on some sculptures for an exhibit. He had an old wooden ball bat that used to belong to his sister, as his parents were cleaning up after the tornado, they recovered it and passed it on to a kid in the neighborhood.

Brandon, being the sentimental artist that he was, convinced the kid to give it back to him so that he could use it in a sculpture.

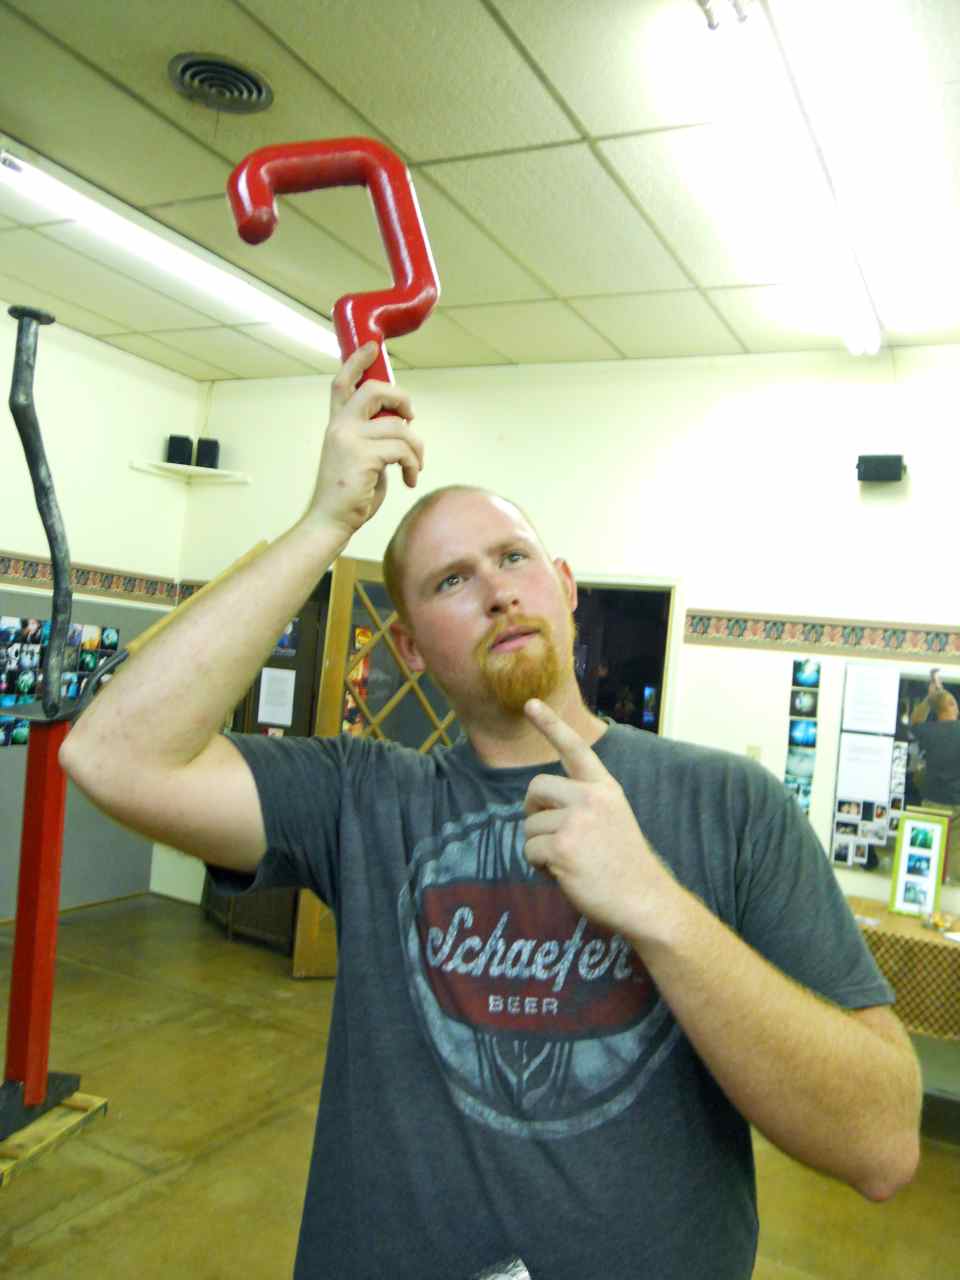
While at my house, he sawed off the top and bottom and used a wood rasp to add texture to the surface of the bat. Then he covered it with foil tape. Then he spray painted the entire thing....and used sand paper to wipe off some of the paint. I watched, perched on my back steps, sweating as he completely transformed the old bat.

He looked up and smiled, "Faux cast aluminum!" he exclaimed.
You can see the bat in the photo above......it has a question mark sticking out of one end...and an arrow pointing at my dorky friend on the other end. By transforming wood to look like metal, he can take an all-wood sculpture keep it light-weight, but make it appear to be mixed-media.

Did I mention that Brandon has an MFA in sculpture? He is pretty awesome. And he is a goofball.

I took an idea right from his master's studio and tweaked it to fit the materials I had on hand for high school students. In the DIY below, we are using soap, but any wood would be acceptable instead if you have some in your studio.


 This is a great carving project which has stunning results, using mostly house-hold items!

 You will need:
  • Soap (either full bars or travel size, we like the free ones from hotels)
  • Carving tools (potato peeler, paring knife, exacto, utility knife, speedball linoleum cutter, and if the soap is soft you could use an ink pen)
  • Foil tape, can be found at hardware stores like Lowe's or Home Depot
  • Large pink eraser or cork
  • Black paint and brushes
  • Paper towels
  • Wire


Step 1:
Gather your materials and sketch out a design for your soap.
Some soaps are difficult to carve while others can practically be molded with your fingers. We had a huge stash of soaps from hotels.


When selecting your tools, think about ordinary objects that might be used to create cool textures in the soap. The potato peeler is great for carving off edges while the cheese grader works like a wood rasp to create a shaved texture on the surface of the soap.
 The wire can be used to fix anything that might break off....It is also good for assembling pieces to a base.


Step 2:
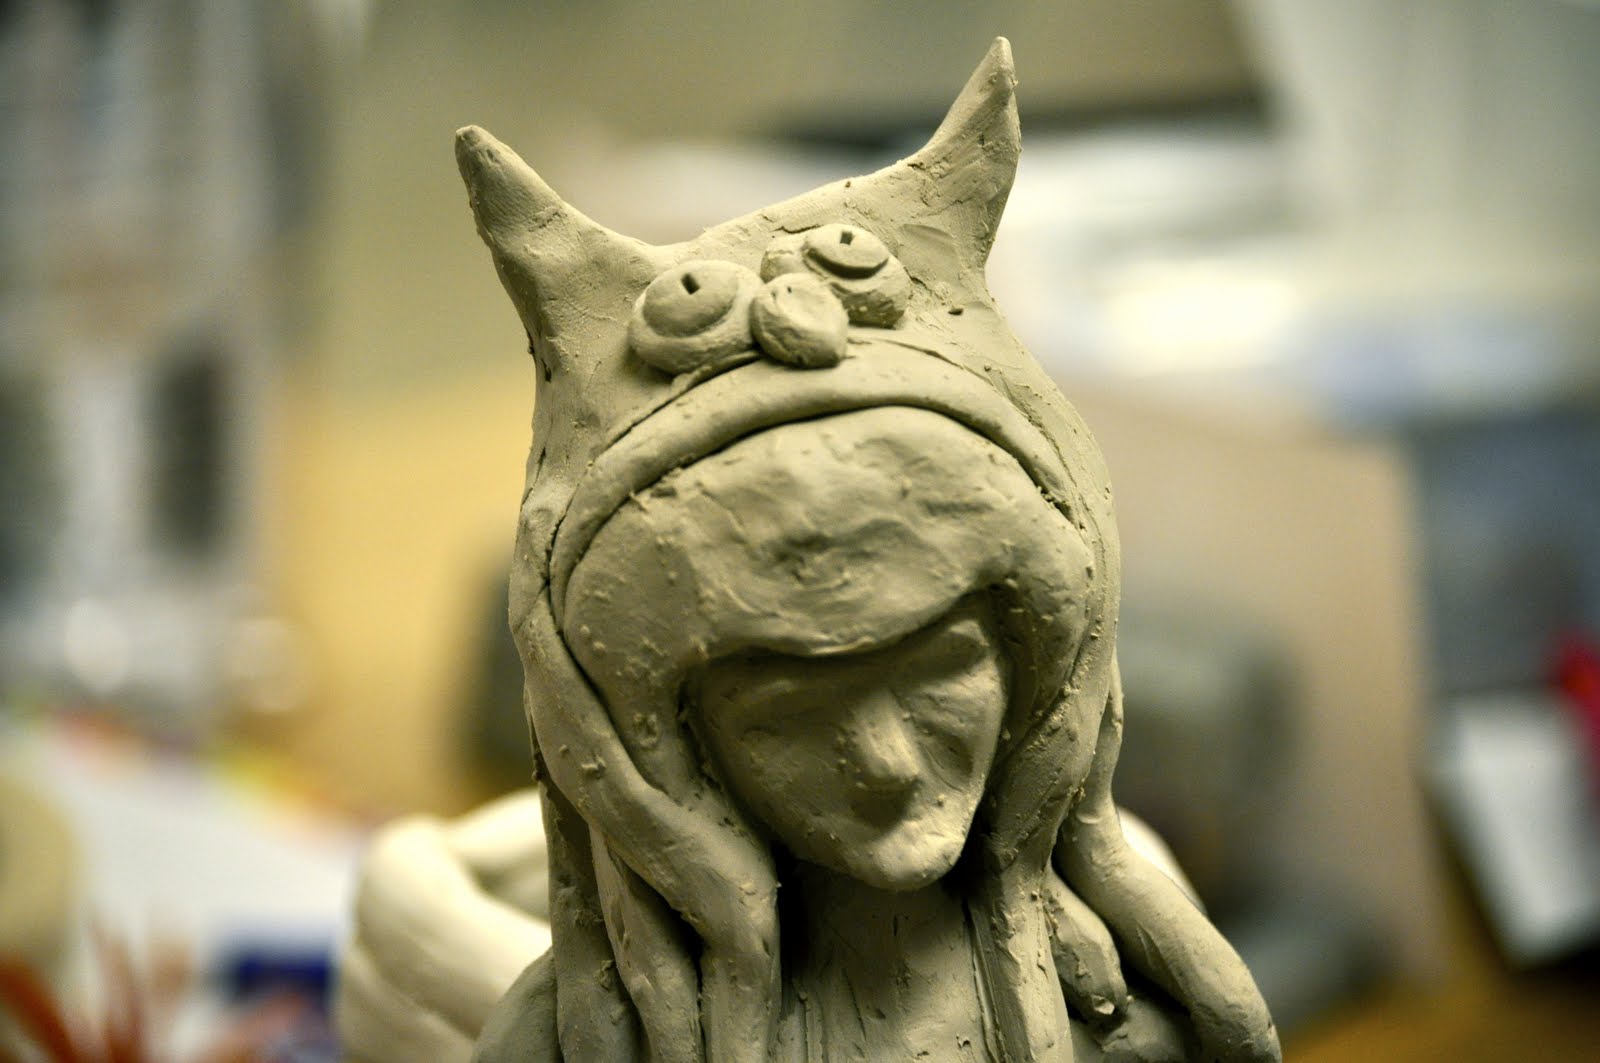
 Carve your design into the soap using your carving tools. A speedball lino cutter works really well for images like this face. Remember to create a relief on the surface, leaving some areas raised.


If your sculpture is in-the-round, like the one below, you will need to carve every side.


Step 3:


 Cover your soap carving in foil tape. We like to cut small squares and strips to make covering easier. When the entire surface is covered, use a pink eraser or cork to burnish the surface, flattening some of the creases, by rubbing it with a piece of rubber or cork, you help the foil to adhere to the smaller details, showing off the relief and adding texture.


(Here are my examples)
They sort of look like chocolate foil bunnies!

Step 4:
If you created a base for your sculpture, or if a piece of it breaks before you cover it in foil tape, you can use wire to attach the pieces together. Be sure to give your soap the 'poke' test before you use it in your sculpture, if it is too hard to poke wire into, you won't be able to use it as a base or attach it to a base.


Step 5:
Once your sculpture is covered in foil tape, and the pieces are assembled, use a paint brush to cover the surface in black paint. The black paint will fill in the cracks. Wipe off the paint before it dries. This will give your sculpture the look of cast aluminum!


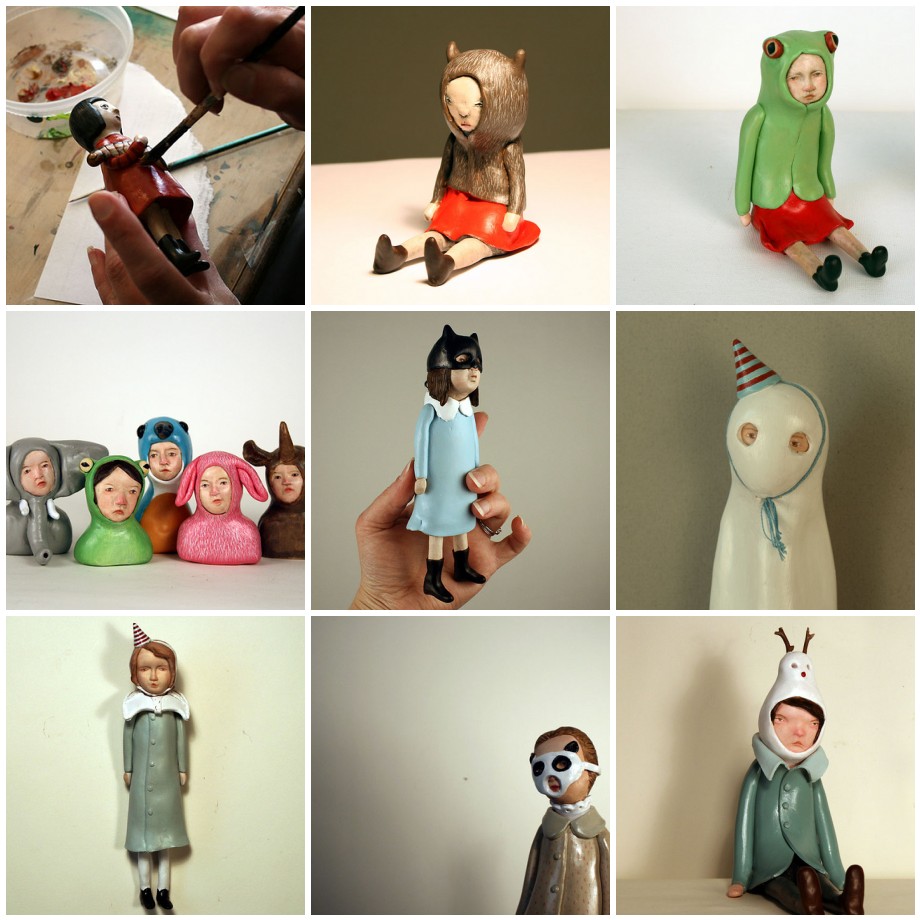
Make a series of sculptures and show them off!


Here are the sculptures made by my students:


This DIY was featured on the Art Juggler blog!!

If you try this sculpture yourself, please leave a comment with a link to your project, I would love to see it!!

A Vision for Joplin

A muralist is in Joplin, meeting with the community, planning a mural for our city and he asked a group of my students to draw what they wanted to see in the mural, to draw their vision of Joplin.

The teenagers had trouble coming up with ideas because before the tornado, Joplin was pretty boring...and since the tornado, everything that we used to take for granted is so much more precious.

We drew a sketch for our mural and put a big drive-in screen, with cars from every decade parked in front...and a playground with children who could see 'butterfly men' fluttering around them.

Our sketch had lots of trees, and somewhere in the design, we wanted people wading in a creek, catching crawdads. We thought it was important for the mural to show downtown and discussed how much of the mural should be devoted to the tornado. The students agreed that they wanted it to show happy people in Joplin.

Here is the mural team at Spiva, presenting their history, how they are working with the Midwest Art Alliance to bring art to small comunties....sharing a bit about what they do and also showing us example of other murals they have done. The more I learn about Dave, and what he has done in other communities, I am so impressed and excited about the mural.

This project is going to be amazing, I cannot wait to see what Dave and his team come up with for Joplin. To follow their progress and read about what the are doing around town, you can follow the blog here: http://joplincommunityartproject.blogspot.com/
While the team was there, we showed them the mural we made.

Art Lounge students made a list of words to describe how people in Joplin felt after the tornado. The students, aged 10-16 selected some of the positive words and some of the  negative words from the list to include in the mural around a central figure. The figure in the center was left faceless so that viewers can picture the faces of those who helped them after the storm. The figure represents neighbor helping neighbor to cleanup and rebuild.

The mural was created on a blue tarp, which represents the new, yet temporary landscape of the city. The acrylic paint will eventually peel and chip off the surface, just as the blue tarps will be replaced with shingles and new roofs.
The Art Lounge mural is currently on display at Spiva if you want to see it in person.

I plan to photograph the Joplin mural project while it is in progress so watch my blog for future updates.

What would your vision for the mural be? What would you include in a mural about Joplin?


Friday, May 20, 2011

Photo Collage Friday. {Number Five}

Last night the local art center hosted a viewing of short films created for  a 36-hour film competition.

The requirements: Use one flour tortilla, the film must be filmed downtown (or at least a portion of it) and it must include the line: 'some things are better left unsaid'. The videos also had to be 3 minutes or less.

I will share a link and the video shortly. Here is a behind the scenes look at the making of the movie.

We worked really hard for 36 hours...got very little sleep...and used hundreds of spray painted flour tortillas to create a very unique stop-motion film. 
It was so much fun. 


Thursday, May 5, 2011

Time Lapse? yes, please!!

I absolutely love time lapse videos. Last week, during Art Lounge, my students worked on some air dry clay sculptures and I totally wanted to capture a video using while the students were working...but somehow, I totally forgot! The sculptures {inspired by DoubleParlour} are almost ready to be painted and finished....so I hope to get some images soon, but for now, you can see the canvas paintings we started.


Happy Cinco de Mayo!

Wednesday, April 20, 2011

DoubleParlour Interview and Self Portrait Inspriation

Recently, I mentioned that I am teaching a class at a local art center. The class is called Art Lounge and it is geared towards high school students. 

One requirement of the class is to create art using a variety of traditional materials...my goal is to keep things as current as possible. 

The next nine weeks is devoted to creating self-portraits. I directed students to look at a Missouri art teacher who is on a quest to create 365 self-portraits...or a self-portrait-a-day. Wow! What a task! You can follow him here. The fact that he has the stamina to create such varied and interesting self-portraits every day, AND write a blog post about each one is so impressive!

I had my students look at Jim's artwork and then create a drawn portrait. (I will share their images later)


As I continued to research artists creating interesting, modern and wonderful self-portraits, I found  DoubleParlour on Etsy and I was immediately intrigued. 

Their artwork reminded me of a couple of books in our school library.

I decided it would be necessary for my students to see the images in the books...and images by the artists in order to design a clay self-portrait. I encouraged them to plan their portrait to be about 12" tall, similar to an action figure. You can see more of DoubleParlour's artwork on Flickr.
Here are a few of my favorites: 

1. Amia, 2. maiya, 3. leona, 4. group, 5. lydie no.1, 6. birthday ghost no.2, 7. Carrieanne, 8. Sabelle, 9. Fletcher #1

In order to get a bit of insight into their creative process, I sent the artists a little list of questions and they were happy to oblige! Thank goodness for sweet internet artists!

Doubleparlour Cassandra and Ernie Velasco San Francisco, CA

1. Where do you find inspiration for your sculptures? Are they based on real people, self portraits or aspects of your personality? Do you take commissions?

We find inspiration for our sculptures from all sort of places....including natural science, architecture, music, decay, humor, social norms and deviance. Some of our characters are based on aspects of real people from photos in news clippings, movies, acquaintances, and strangers. There is always something unique about every person, even if that person appears to be dull, normal, or blends in with the crowd. However, more often then not, our characters come directly from our imaginations...probably a kaleidoscope of images and thoughts we have throughout the day.

We sell our artwork online, in galleries and at local craft fairs. We do commissioned work, primarily requests from on-line collectors. Some commissions are requests to make a sculpture similar to a piece that has sold. Once in a while we receive requests to create a sculpture of a loved one based on photos with particular elements such a favorite animal or dress. Those pieces are difficult as it is hard to know what the requester has pictured as the final outcome.


2. Tell us a little bit about your process, do you draw the characters before you make them? Do all of the drawings become sculptures or paintings?

Although we collaborate on a few of our sculptures, generally we work separately, creating most of our pieces individually from start to finish. I would say each sculpture starts with an idea and sometimes a quick sketch. We prefer to do little planning and to let each piece evolve. We do more detailed drawings for paintings or illustrations...some of which become prints. A sculpture begins with an armature of aluminum foil and wire. The armature is then skinned with polymer clay for small parts with delicate details (i.e. faces), baked, and then skinned with an air dry two-part resin. The majority of the sculpture is usually formed with resin, as it is less fragile.


3. It is awesome that you collaborate on some of the characters. Most of them appear to be ambivalent, sad or they have forced smiles. Is that some thing you do intentionally or do they take on a life of their own? What do you want your audience to feel when they look at one of your sculptures?

Our characters generally have a contemplative look, like they are lost in thought or hiding something. I suppose we want our audience to feel curious or sympathetic to the character's personality or perceived emotional state.

4. My favorite sculpture is Doreeh.


What is your favorite?

Cassandra's favorite piece is "Can't see the forest for the trees"....it was one of my most difficult pieces to make, I love it! 

 Ernie's favorite is Bezz and Dezz.

5. Where do you live? Do you have another job or do you get to make art full time?

We live in San Francisco, we have live here for about 16 years now in the BEST neighborhood...Lower Haight. Cassandra works full-time at a hospital and creates art part-time. Ernie quit his job as a pastry chef about 2 years ago to do art full-time.

I am so grateful to Ernie and Cassandra, thank you for taking the time to answer my questions!! Watch for an updated post soon, with student work!


Monday, April 18, 2011

So inspired by Art Lounge

I haven't even had time to share the new class I am teaching at the local art center.

Art Lounge, a hip safe place for students to explore the visual arts.

Each week a group of 14-18 year-old students meet at the art center for art making and dinner. It is super fun to work with the older students, I really love it!

One aspect of the class is creating a group artists blog.
The students designed and named the blog: Art Juggler. 
Check it out and be come a  follower here!

One of my goals for the class is to share with them living, breathing artists so they can get a feel for what it is like to be a real artist in this world, and they can learn how to use technology to share their work with an audience.

Here are a few recent projects:

Polaroid Self-Portraits 
Inspired by Danny Brito's Polaroid Project
I shared this interview with my students. 

Shadow Street Art
Inspired by Color Me Katie 
See more of her street art here.
Read about our adventures here and here.


Paint-By-Number Style Acrylic Canvas Paintings 
Inspired by the Birds of a Feather blog


This week, we are working on 'Action Figure Self-Portraits'. I will share the details soon! Be sure to check out the http://artjuggler.blogspot.com/ Share the link with anyone you think might be interested! Thanks for reading!

Monday, January 17, 2011

Working with a team of artists...

On Saturday, I had the awesome opportunity to collaborate on a really cool project. Every year, a thousand area 3rd graders visit a local art center. The students get a chance to see the show, make some art to take home and also help create some sort of large-scale project. Last year, students painted a patch of some huge murals, this year, they will be helping create an outer shell for a large-sculpture.

The education committee at the art center, (me included) came up with the idea last fall and recruited a local artist to help build the armatures for the sculptures. It was decided that we would construct 3 armatures of welded metal covered in poultry wire and then the students, over the course of 3 weeks, a thousand kids would help cover the surface of the wire by tying, wrapping and weaving bits of paper, fabric, cardboard and other materials to the surface. At the end, we hope to gesso or modge podge a final layer so the sculptures can stand outside.

The sculptures are designed to resemble artwork from the current show that is in the gallery. Linda Mitchell is a truly inspiring artist. I love animal paintings and her website does not do her work justice, her work is seriously so beautiful. If you are in need of some new inspiration, definitely check her out.

Saturday, under the smell of the melting welded metal, and the sound of the an iPod set to shuffle, we worked at the amazing studio of another artist, Jorge Leyva. Just to give you an idea of how cool this studio is....here is his painting studio....
Here is the breezeway connecting his painting facility to the sculpture garage:


And here is the place where all the magic happens:


And by magic...I mean this:

 Taking a painting, making a sketch.....forming the metal and connecting the pieces....
 To make something great.

I am in awe of artists who can take an idea and make it totally 3-D.

Jorge constructed the metal skeleton of the form by welding together rebar, while the rest of wrapped the chicken mesh around the form to give it some bulk. We zip-tied the wire to the metal form, and after many scraped fingers, ripped thumbnails and some blood, we had finished the elephant on the box....and the body for the rhino. Jorge is still working on the head. He is also going to create a large dog so that we will have 3 sculptures for the 3rd graders to cover.
Here is phase 1 of the sculpture project. It was so much fun getting dirty and working in a real artists' studio. I almost don't want to waste these sculptures on little kids...I want to help finish them myself!


 The elephant-in-a-box in all its glory.
 Josie Mai and me. Saying 'I helped wrap the head' is a little like saying 'I carried a watermelon'....yeah, I helped, but she totally made this thing happen, I was a little more like the errand boy/assistant to the regional manager.
 The 3-D chest of the Rhino.
 The hot boots.

I'll keep you posted on the progress of this project. The kids will be visiting the art center starting next week. I can't wait to see these finished.

Find new inspiration from these artists: 

Linda Mitchell
Josie Mai
Jorge Leyva

Please leave a comment with feedback if you check out any of the artists linked above ;-)