Showing posts with label sculpture. Show all posts

Wednesday, July 27, 2011

Faux Aluminum Sculptures DIY +{the inspiration}

 I don't normally share art lesson plans on this site, but I am pretty proud of this one. While brainstorming about my Art Lounge class for high schoolers at a local art center, I put several things together to come up with this highly successful project.

First, my mom had just given me a huge bag of hotel soap that had been donated to her during the tornado relief. I knew I would think of something to do with it.

Second, I had intended to do a carving project with the Art Lounge students either incorporating potato carving or soap as a stamp for a 2-D project. I was getting a little sick of 2-D and so were the kids.

Third, my friend, Brandon Nepote was at my house a couple of weeks ago working on some sculptures for an exhibit. He had an old wooden ball bat that used to belong to his sister, as his parents were cleaning up after the tornado, they recovered it and passed it on to a kid in the neighborhood.

Brandon, being the sentimental artist that he was, convinced the kid to give it back to him so that he could use it in a sculpture.

While at my house, he sawed off the top and bottom and used a wood rasp to add texture to the surface of the bat. Then he covered it with foil tape. Then he spray painted the entire thing....and used sand paper to wipe off some of the paint. I watched, perched on my back steps, sweating as he completely transformed the old bat.

He looked up and smiled, "Faux cast aluminum!" he exclaimed.
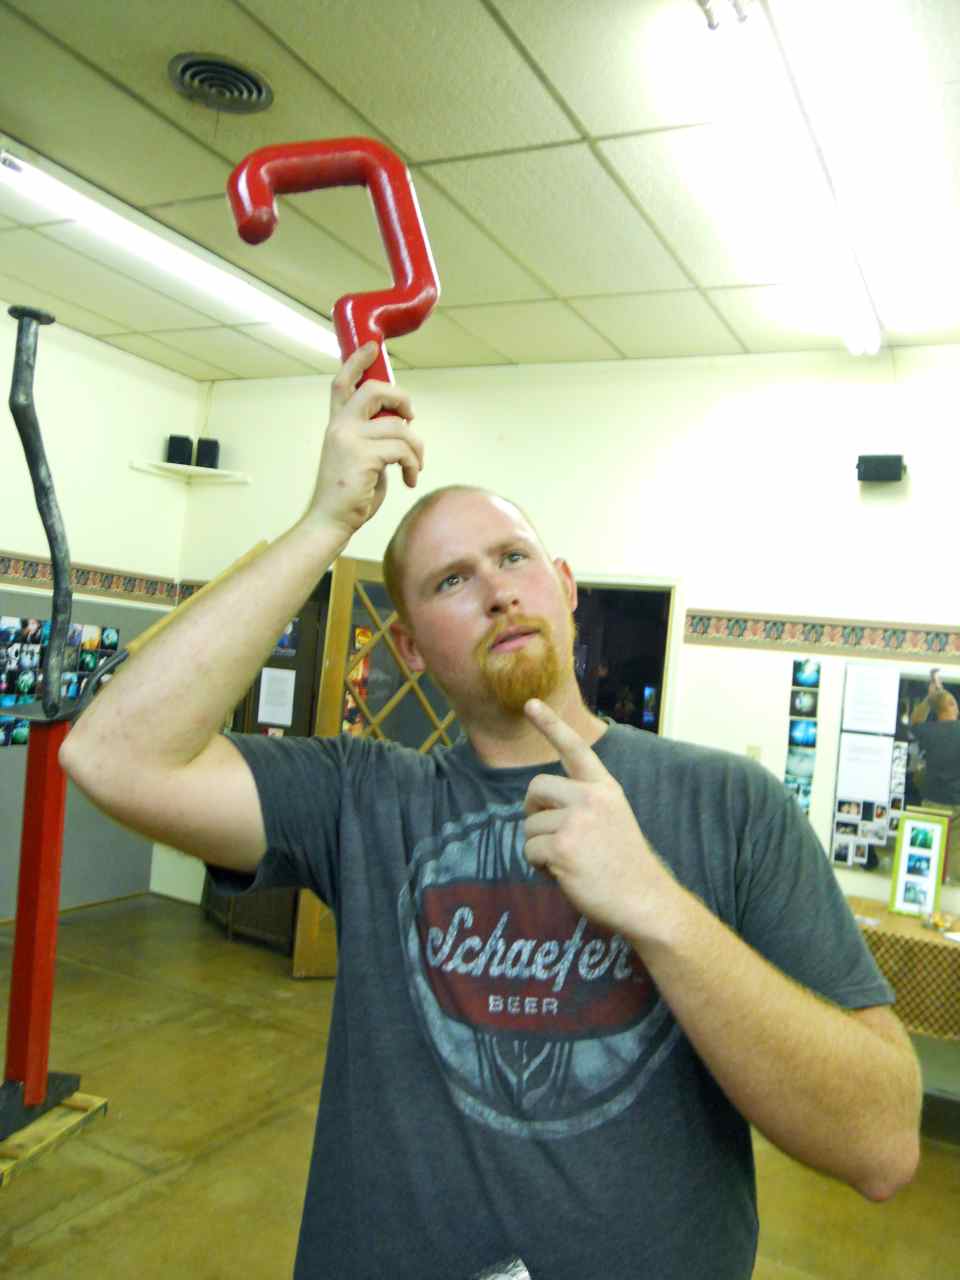
You can see the bat in the photo above......it has a question mark sticking out of one end...and an arrow pointing at my dorky friend on the other end. By transforming wood to look like metal, he can take an all-wood sculpture keep it light-weight, but make it appear to be mixed-media.

Did I mention that Brandon has an MFA in sculpture? He is pretty awesome. And he is a goofball.
I took an idea right from his master's studio and tweaked it to fit the materials I had on hand for high school students. In the DIY below, we are using soap, but any wood would be acceptable instead if you have some in your studio.


 This is a great carving project which has stunning results, using mostly house-hold items!

 You will need:
  • Soap (either full bars or travel size, we like the free ones from hotels)
  • Carving tools (potato peeler, paring knife, exacto, utility knife, speedball linoleum cutter, and if the soap is soft you could use an ink pen)
  • Foil tape, can be found at hardware stores like Lowe's or Home Depot
  • Large pink eraser or cork
  • Black paint and brushes
  • Paper towels
  • Wire


Step 1:
Gather your materials and sketch out a design for your soap.
Some soaps are difficult to carve while others can practically be molded with your fingers. We had a huge stash of soaps from hotels.


When selecting your tools, think about ordinary objects that might be used to create cool textures in the soap. The potato peeler is great for carving off edges while the cheese grader works like a wood rasp to create a shaved texture on the surface of the soap.
 The wire can be used to fix anything that might break off....It is also good for assembling pieces to a base.


Step 2:
 Carve your design into the soap using your carving tools. A speedball lino cutter works really well for images like this face. Remember to create a relief on the surface, leaving some areas raised.


If your sculpture is in-the-round, like the one below, you will need to carve every side.


Step 3:


 Cover your soap carving in foil tape. We like to cut small squares and strips to make covering easier. When the entire surface is covered, use a pink eraser or cork to burnish the surface, flattening some of the creases, by rubbing it with a piece of rubber or cork, you help the foil to adhere to the smaller details, showing off the relief and adding texture.


(Here are my examples)
They sort of look like chocolate foil bunnies!

Step 4:
If you created a base for your sculpture, or if a piece of it breaks before you cover it in foil tape, you can use wire to attach the pieces together. Be sure to give your soap the 'poke' test before you use it in your sculpture, if it is too hard to poke wire into, you won't be able to use it as a base or attach it to a base.


Step 5:
Once your sculpture is covered in foil tape, and the pieces are assembled, use a paint brush to cover the surface in black paint. The black paint will fill in the cracks. Wipe off the paint before it dries. This will give your sculpture the look of cast aluminum!


Make a series of sculptures and show them off!


Here are the sculptures made by my students:


This DIY was featured on the Art Juggler blog!!

If you try this sculpture yourself, please leave a comment with a link to your project, I would love to see it!!

Thursday, February 3, 2011

Collaborative art....

A couple of weeks ago, I had a chance to help a group of artists create a sculpture. I wrote about it here.

The student visit to the local art center is well underway and they have started covering the first big sculpture with bits of fabric, paper, tissue paper, cardboard and other things. Students are weaving colorful bits of this and that through the chicken wire mesh.


Still much more to be done...this is an 'in-progress' stage...I can't wait to see it finished!!

Monday, January 17, 2011

Working with a team of artists...

On Saturday, I had the awesome opportunity to collaborate on a really cool project. Every year, a thousand area 3rd graders visit a local art center. The students get a chance to see the show, make some art to take home and also help create some sort of large-scale project. Last year, students painted a patch of some huge murals, this year, they will be helping create an outer shell for a large-sculpture.

The education committee at the art center, (me included) came up with the idea last fall and recruited a local artist to help build the armatures for the sculptures. It was decided that we would construct 3 armatures of welded metal covered in poultry wire and then the students, over the course of 3 weeks, a thousand kids would help cover the surface of the wire by tying, wrapping and weaving bits of paper, fabric, cardboard and other materials to the surface. At the end, we hope to gesso or modge podge a final layer so the sculptures can stand outside.

The sculptures are designed to resemble artwork from the current show that is in the gallery. Linda Mitchell is a truly inspiring artist. I love animal paintings and her website does not do her work justice, her work is seriously so beautiful. If you are in need of some new inspiration, definitely check her out.

Saturday, under the smell of the melting welded metal, and the sound of the an iPod set to shuffle, we worked at the amazing studio of another artist, Jorge Leyva. Just to give you an idea of how cool this studio is....here is his painting studio....
Here is the breezeway connecting his painting facility to the sculpture garage:


And here is the place where all the magic happens:


And by magic...I mean this:

 Taking a painting, making a sketch.....forming the metal and connecting the pieces....
 To make something great.

I am in awe of artists who can take an idea and make it totally 3-D.

Jorge constructed the metal skeleton of the form by welding together rebar, while the rest of wrapped the chicken mesh around the form to give it some bulk. We zip-tied the wire to the metal form, and after many scraped fingers, ripped thumbnails and some blood, we had finished the elephant on the box....and the body for the rhino. Jorge is still working on the head. He is also going to create a large dog so that we will have 3 sculptures for the 3rd graders to cover.
Here is phase 1 of the sculpture project. It was so much fun getting dirty and working in a real artists' studio. I almost don't want to waste these sculptures on little kids...I want to help finish them myself!


 The elephant-in-a-box in all its glory.
 Josie Mai and me. Saying 'I helped wrap the head' is a little like saying 'I carried a watermelon'....yeah, I helped, but she totally made this thing happen, I was a little more like the errand boy/assistant to the regional manager.
 The 3-D chest of the Rhino.
 The hot boots.

I'll keep you posted on the progress of this project. The kids will be visiting the art center starting next week. I can't wait to see these finished.

Find new inspiration from these artists: 

Linda Mitchell
Josie Mai
Jorge Leyva

Please leave a comment with feedback if you check out any of the artists linked above ;-)